Views functionality
3D Views
You can add a new 3D view by clicking on the button  in the main toolbar.
Navigating in view
The 3D view is the most used in ComputreeGUI, because it allows to view items created by the steps in three dimensions. It uses OpenGL, valuing the graphical component QGLViewer ( http://www.libqglviewer.com/). 3D navigation is as follows:
- Moving mouse while holding left button translates the view to the left, right, up or down
- Moving mouse while holding right button rotates the view relative to its center: by default (0,0,0)
- The wheel is used to zoom or unzoom
All other options provided QGLViewer by are also available: type “h” after clicking on the view to get the list of possibilities.
Toolbar
The toolbar provides access to additional features.

Button  allows to manage views (camera settings). Details on viewsDetails on views
By clicking on the views button, the following menu is obtained:
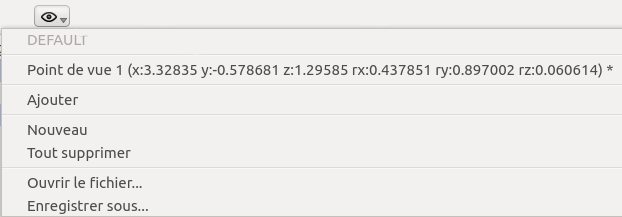
It contains:
- At the top of this menu is grayed out the name of the current file views ( DEFAULT in general case)
- Then include the list of available points of view (previously recorded). One click sets the view to the corresponding point of view.
- Add: Creates a new point of view by saving the current camera settings. Then a dialog opens to choose the name.
- New: Resets the system views (without saving DEFAULT)
- Delete all: delete all recorded points of view
- Open file: loads in memory previously saved file of points of view
Loading a “points of view” file erases the currently available points of view.
- Save As: Saves the current points of view in a file.
In fact there is always a file containing the available points of view. When installing Computreethis file is DEFAULT. If the user do Save as, the the saved file becomes active and retain the points of view created from this moment. If user do Open file, then the loaded file becomes active, and will become the storage location of the new points of view created after.
Button  provides access to Exporters for selected items. This functionality is described in the Using Exporters.
Button  allows you to set preferences for the view. Details preferences fo viewDetails preferences fo view
By clicking this button, a dedicated dialog box opens:
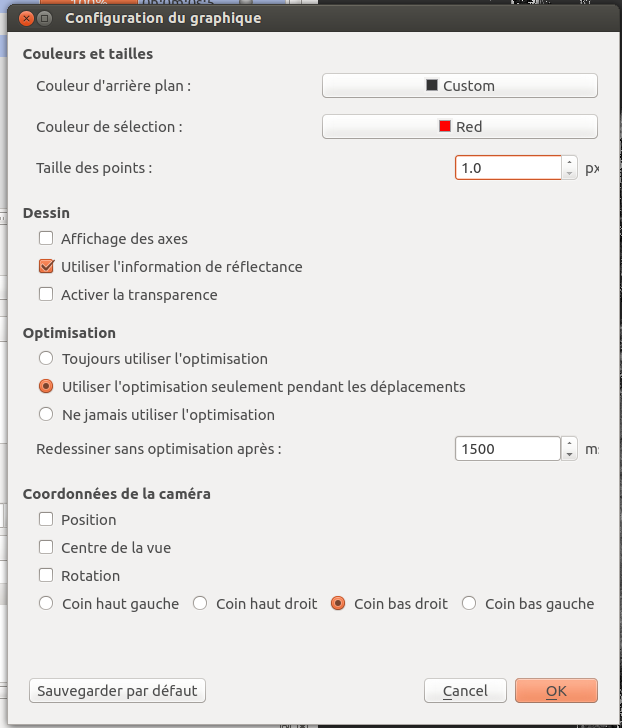
- Part colors and sizes allows to choose the background color, the selection color and drawing size of points
- Display axes: displays the axis (X, Y, Z) at the center of the view
- Use reflectance information: displays the points with a brightness proportional to their intensity value. Else they are all displayed in the same color (typically white)
- Enable transparency: displays the geometric shapes with transparency
- the Optimization section presents three alternatives
- Always use optimization: reduction of points number all the time
- Use optimization only when traveling: reduction of points number during moves, all points are drawn after the time set in redraw after...
- Never use optimization: always draw all points ever when moving
- Camera section gives the camera the ability to display the coordinates (center of the view, position of the camera, camera direction) in a corner of the view
- Button default saves the current settings as default for future sessions.
Button  can apply a color to points / faces / half-edges attributes. Details on coloring attributesDetails on coloring attributes
By clicking this button, the following dialog box is obtained:

- The left column lists the attributes available in all steps for each category of data that can be colorized in this way
- Points
- Faces
- Half-edges (edge)
- The second column is used, using buttons, for mapping colors gradient to elements, considering attribute values
- The third column allows to use the shared gradient
- The fourth column provides access to a configuration windows for MIN and MAX values used for the attribute (it is interesting for overcoming outliers)
- The lower part allows to choose the gradient used. You can add as many colors as needed.
- The check-boxes at the bottom, allows to directly use the color / normal attributes in place of the displayed gradient.
 /
/  /
/  allows to manage graphic optimization (as in the dialog obtained by button ) :
- : reduction of points number during moves
- : reduction of points number all the time
- : always draw all points ever when moving
The buttons suite  /
/  /
/  allows to manage points size (1 / 2 / 3 pixels).
Button  launch the computing of an octree. This acceleration structure allows quicker selections (particularly for points selection).
The creation of octree has to been redone when the content of the view changes. It could take a lot of time for big scenes.
Button  opens a menu with following icons:


 . Each icon defines camera orientation according to the selected point of view.
Button  adjusts the extends of view to the bounding box of the displayed items. This allows also to define the extension of the area displayed by the camera. It recalculates the front and back clipping planes (nothing is drawn forward / beyond these planes). This button works only with items, for which bounding box is correctly set (this is always the case with items containing points).
Button  set the center of rotation for the camera on the center of the selected item / points.
Button  set the center of rotation of the camera on the center of the bounding box of all displayed items.
Button  set the center of rotation of the camera to (0,0,0)
Button  allows to manually adjust all camera settings. Details on camera settingDetails on camera setting
By clicking the button, the following menu is obtained:
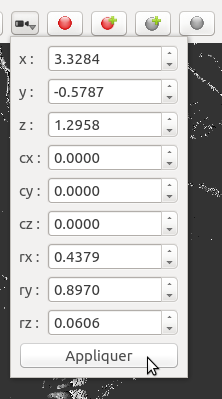
The following parameters can be modified:
- (x, y, z): position of the camera
- (xc, yc , zc): center of the view
- (rx , ry , rz ): viewing direction of the camera (between 0 and 1)
Synchronization of 3D views
It is possible to synchronize cameras of multiple 3D views: so when you change one view, the other views adjust to be synchronized from the same point of view.
You just have to activate the button Sync of the toolbar of each view you want to synchronize. The button is then modified in Sync.
There is only one stream synchronization between 3D views, even if you can add as many views as you want to this stream.
2D views
You can add a new 2D view by clicking the button  in the main toolbar.
A 2D view works just like a 3D view, but the camera is locked on a point of view from the top.
Moreover the projection is *orthoscopic *, removing any perspective effect.
Tabular views
You can add a new tabular view by clicking the button  in the main toolbar.
General functionning
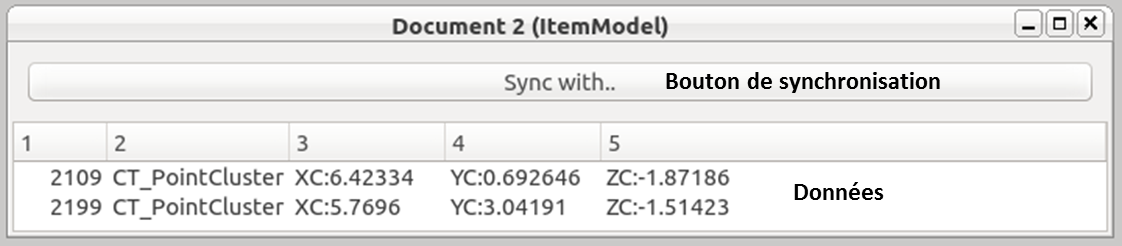
A tabular view displays attribute information of the items it contains. Items of different classes can be added to the same table view.
Each line displays the data of an item with a column for each field.
In all cases the column 1 contains the unique identifier of the item, and column 2 the name of its class.
In the general case we add items to a table view in the same way as a 3D view:
- Using Model Manager
- Using Items Manager
Synchronization
A table view can also operate in synchronization mode. In this case it synchronizes the table view with one or several 3D views (or other). Then any item selected in one view is also automatically added to the table view (if an item is deselected it is removed from the table view also).
To synchronize views with the table view, you must click on the button... Sync with, and then check the views that you want to synchronize.

General Features
It is possible to delete the contents of all views by clicking the button  .
.
View menu is used to rearrange views in the view area:
 ...version française de cette page